ADDING SUNSHINE AND GLOW TO YOUR PHOTOS

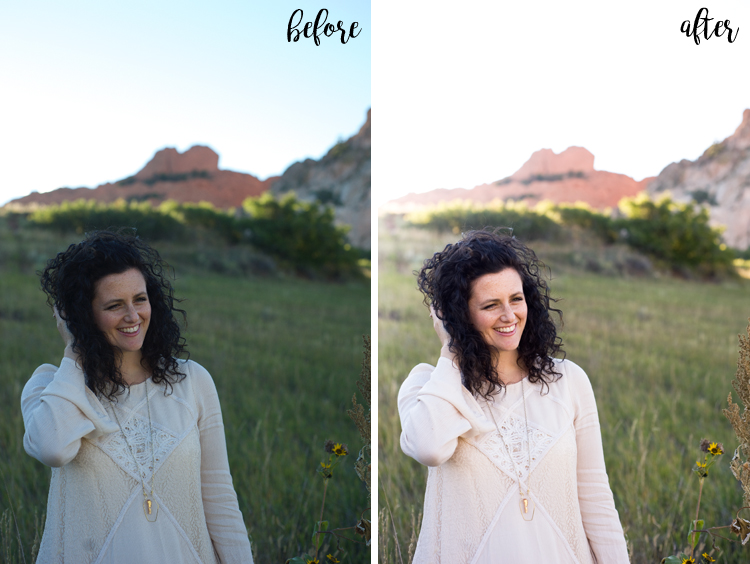
One thing I absolutely love is when I can create and see a huge difference in my post processing. This is always different per session as lighting really dictates how my raw images come out. In todays session you can see a huge difference in my raw file and my post processed file. I get a little giddy inside when I've made such a difference in my photos.
This session was apart of the the mountain photo session we did in Colorado. You can see Beth's here and Meg's here. My goal in processing this session was to create the same kind of lighting and ethereal feel that I had done in Beth's and Meg's session even though the overall lighting was different. Amy's session took place at the end which meant the sun was considerably lower in the sky, meaning her photos were a little darker and far more green then I wanted.
WHITE BALANCE & TEMPERATURE
For this set of photos I went through these 8 steps. In short I adjusted my white balance and temperature. For these photos I needed to warm them up and remove a lot of the green and blue tones. This is easily done by adjusting the white balance and making the photo a little warmer. To remove the green tone I adjusted the temperature and increased the magenta tone in the photo.
From there I increases my exposure and brightness. Adjusted my contrast, clarity, and vibrance. And occasionally I'll increase my blacks to increase my saturation.
ADD A GRADIENT
Now let's talk about how we can add the allusion of a little bit of sunshine. I haven't always used gradients in my photos, but I have been using them more and more for all sorts of things. For these photos I wanted to add the allusion of a little bit of sunshine streaming into my photos. Not a lot, but enough to add a little bit of glow. Both Photoshop and Lightroom have a gradient tool so you should be able to play around a little bit to become more comfortable.
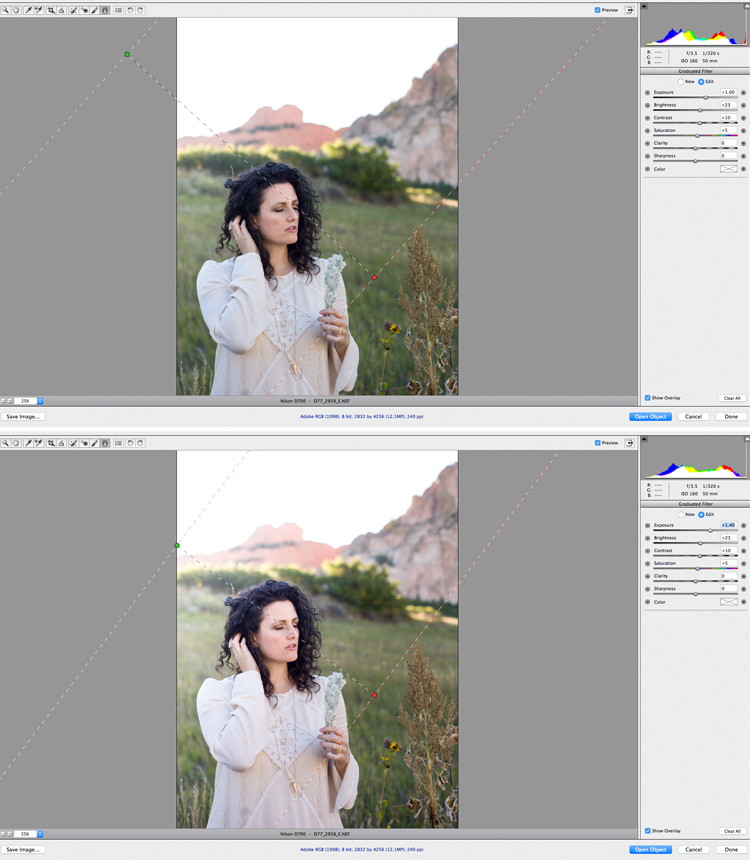
Below you'll see an example of adding a gradient to photos. With a gradient I can adjust the exposure, brightness, contrast, saturation, and clarity of a specific area of my photo. See my gradient below? I knew where the sun should be streaming into the photo so I added a gradient to the top left portion and increased the exposure and brightness in the top left portion of the photo. The gradient works so that the increase in exposure and brightness fades into the photo.
Look at the two examples below. I added a gradient in the first example but I didn't feel like I was getting enough "sunshine" in the photo as I wanted. I adjusted my gradient in the second example and you can now see how it looks like more sunshine is streamy into the photo. Adding gradients is a perfect way to add a pop of sunshine to your photos. :)


Processing and editing photos is journey and a real learning experience. I edit photos completely different now then I did when I first got started. Editing photos is also very subjective. My style of editing can be completely different then another person style of editing and they can both be beautiful photos. We all have our own style and preferred way of editing. It's all about finding our own groove. xoxo. Samantha